Monday, 11 November 2024
How to Design and Build a Pole Barn for an Office or Workshop
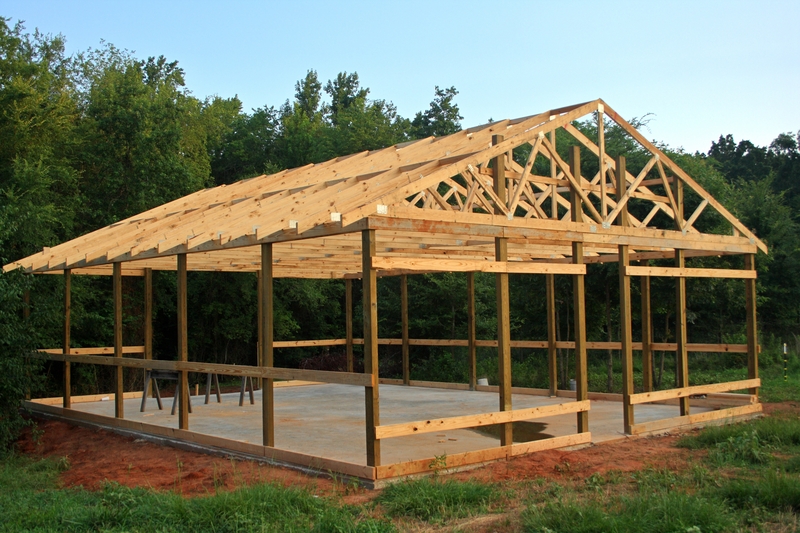
Pole barns, with their simple construction and adaptability, have become increasingly popular for various purposes, including offices and workshops. This guide provides a comprehensive overview of the design and construction process, covering key aspects from initial planning to final touches.
1. Planning and Design
a. Determine Your Needs and Goals:
Usage: Define the primary purpose of the pole barn, be it a home office, a woodworking workshop, or a combination of uses.
Size: Consider the required square footage for your equipment, furniture, and desired layout.
Budget: Set a realistic budget, factoring in materials, labor, permits, and potential contingencies.
Location: Choose a site that meets your specific needs, considering access, utilities, and local zoning regulations.
b. Design Considerations:
Foundation: Pole barns typically utilize concrete piers or footings, offering stability and longevity. Consider the soil conditions and potential frost lines.
Framing: The primary structure consists of heavy-duty posts, beams, and purlins made from treated lumber. Consider using engineered lumber for increased strength and durability.
Roof: Choose a roof style that complements the building's purpose and aesthetic. Gable, monitor, and gambrel roofs are popular options.
Exterior Walls: Pole barns can feature various wall coverings, including siding, metal panels, and brick. Select materials that provide insulation, weather resistance, and aesthetic appeal.
Windows and Doors: Determine the desired number and size of windows and doors, considering natural light, ventilation, and access needs.
Interior Finishes: Plan for appropriate flooring, insulation, electrical wiring, and any custom features desired.
2. Permitting and Regulations:
Building Codes: Check with your local building department for applicable codes and requirements.
Zoning Restrictions: Ensure your project complies with zoning ordinances related to building height, setbacks, and permitted uses.
Environmental Regulations: Obtain any necessary permits related to soil erosion control, stormwater management, and wildlife protection.
3. Foundation Construction:
Site Preparation: Clear the site and excavate holes for the concrete piers.
Concrete Piers: Pour and cure the concrete piers, ensuring they are level and meet the specified dimensions.
Anchor Bolts: Install anchor bolts into the wet concrete for attaching the pole barn's structural components.
4. Framing and Erecting the Structure:
Post Installation: Install the treated lumber posts on the concrete piers, ensuring they are plumb and anchored securely.
Beam and Purlins: Connect the beams and purlins to the posts using strong metal connectors.
Roof Truss Installation: If using roof trusses, carefully erect and secure them onto the beams.
Wall Sheathing: Attach wall sheathing to the posts and beams, providing a base for siding or other wall coverings.
5. Roofing Installation:
Roof Deck: Install a roof deck, typically plywood or oriented strand board (OSB), over the trusses.
Roofing Underlayment: Apply a layer of roofing underlayment to protect the roof deck from water infiltration.
Roofing Materials: Choose a roofing material that suits your budget and aesthetic preferences, such as asphalt shingles, metal roofing, or tile.
6. Siding and Exterior Finishes:
Siding Installation: Install the chosen siding material, ensuring it is properly sealed and secured.
Window and Door Installation: Carefully install windows and doors, ensuring proper flashing and sealing.
Exterior Trim: Add exterior trim details for aesthetic appeal and to protect the edges of the building.
7. Interior Finishes and Utilities:
Insulation: Install insulation in the walls and ceiling for thermal comfort and energy efficiency.
Electrical Wiring: Run electrical wiring to power outlets, lighting fixtures, and other equipment.
Flooring: Choose a durable and suitable flooring option, considering the intended use of the space.
Interior Walls: Finish the interior walls with drywall, paint, or other desired materials.
8. Additional Considerations:
HVAC: Install a heating and cooling system to ensure comfortable temperatures year-round.
Fire Safety: Install fire suppression systems and smoke detectors as required by local codes.
Security: Implement security measures such as alarms, cameras, and access control systems.
Lighting: Install adequate lighting for work areas, walkways, and exterior security.
9. Conclusion:
Designing and building a pole barn for an office or workshop is a rewarding project that offers flexibility and cost-effectiveness. By carefully planning, following the steps outlined in this guide, and adhering to local regulations, you can create a functional and aesthetically pleasing space to meet your specific needs. Remember to seek professional guidance from licensed contractors, architects, and engineers as needed to ensure the successful completion of your project.
Note: This guide provides a general overview of pole barn construction. Specific details and requirements may vary based on your location, project specifications, and local codes. It is strongly recommended to consult with professionals for detailed planning and execution.

How to Build a Pole Barn with Customizable Dimensions
Hey there, folks! So, you're thinking about building a pole barn. That's awesome! They're super versatile, perfect for everything from workshops and garages to storage sheds and even barns for your furry friends. And the best part? You can build them yourself! No need to call in a team of contractors. You've got this.
But before we get into the nitty-gritty details, let's talk about why a pole barn might be the perfect fit for you.
Why Choose a Pole Barn?
Cost-effective: Pole barns are known for being budget-friendly. You're using less material and you can often DIY most of the work, which saves you a ton of money.
Quick and Easy: Compared to traditional construction, a pole barn goes up relatively fast. Think of it like building a giant Lego set, but with tools and wood.
Customizable: The beauty of a pole barn is its flexibility. Need a high ceiling for your woodworking project? Want extra space for a riding arena? You can design it to fit your exact needs!
Durable: Properly built pole barns can stand the test of time and withstand harsh weather conditions.
Let's Get Started: Designing Your Dream Barn
Alright, now that you're convinced a pole barn is the way to go, let's get down to business and design your masterpiece.
Step 1: Planning and Permits
First things first, you gotta plan it out. Grab a notepad and start sketching out your dream barn. Think about:
Size: Measure the space you have available and figure out how big your barn needs to be. How much stuff do you need to store? Will you have vehicles or equipment inside?
Purpose: This will help determine the layout and features you need. Garage, workshop, barn for animals? Each purpose has different requirements.
Features: Do you want doors on the side? A loft for storage? Windows for natural light? These details will impact your building plan.
Local Building Codes: Check with your local municipality for any building codes or permits required for a pole barn. Don't skip this step â€" you want to avoid any legal headaches later on.
Step 2: Gathering Materials
Now that you have a solid plan, it's time to gather your building materials. This is where it gets exciting! Head to your local lumber yard and load up on:
Posts: These are the foundation of your barn. Choose pressure-treated wood for longevity. The size and spacing of your posts will depend on your design and local building codes.
Beams: These run horizontally across the tops of the posts, providing support for the roof and walls. Consider using dimensional lumber or engineered beams.
Roof Trusses: These are pre-engineered structures that make building the roof a breeze. They come in various sizes and spans to suit your design.
Wall Sheathing: This goes on the outside of your posts and provides a smooth surface for siding and insulation. You'll need plywood or oriented strand board (OSB).
Roofing Materials: Choose from shingles, metal, or even corrugated roofing. Your choice will depend on your budget and aesthetic preferences.
Siding: Wood, vinyl, metal â€" the options are endless! Choose a siding that matches your style and protects your barn from the elements.
Insulation: Keep your barn comfortable and energy-efficient with insulation in the walls and roof. Fiberglass batts, spray foam, and blown-in cellulose are popular choices.
Doors and Windows: You'll need doors for access, and windows for natural light. Think about the size and location for each.
Step 3: Foundation and Post Installation
Time to get your hands dirty! The foundation is the most important part of any structure, so take your time with this step.
Foundation Preparation: Clear the area where your barn will sit and prepare the ground for your posts. You may need to excavate and backfill with gravel to provide a solid base.
Concrete Footings: Pour concrete footings to anchor your posts. These footings should be large enough to support the weight of your barn.
Post Installation: Set your pressure-treated posts into the concrete footings. Use a level to ensure they're plumb (perfectly vertical) and secure them with concrete or bolts.
Step 4: Framing the Barn
Now it's time to build the skeleton of your barn.
Install Beams: Place your beams horizontally across the tops of your posts. Secure them with joist hangers and lag screws.
Install Roof Trusses: Lift and secure your roof trusses onto the beams. You'll need help with this step! Make sure they're evenly spaced and properly supported.
Add Wall Bracing: Install bracing to reinforce your walls and prevent them from bowing or buckling.
Step 5: Sheathing and Siding
Once you have the frame up, you're ready to close in the walls.
Sheathing: Attach sheathing to the exterior of the walls using screws or nails. This creates a solid surface for your siding.
Siding: Install your chosen siding. This step can be done using various methods, depending on the type of siding you've chosen.
Step 6: Roofing
Finally, it's time to cover your barn with a roof.
Underlayment: Install an underlayment layer, usually felt paper, on top of the roof sheathing. This provides an extra layer of protection from the elements.
Roofing Materials: Apply your chosen roofing material, whether it's shingles, metal, or corrugated roofing. Follow the manufacturer's instructions for proper installation.
Step 7: Finishing Touches
You're almost there! Just a few finishing touches and your pole barn will be ready to use.
Insulation: Install insulation in the walls and roof to keep your barn comfortable and energy-efficient.
Doors and Windows: Install doors and windows, making sure they're properly sealed and weatherproofed.
Interior Finishing: Add any interior finishes like drywall, paint, or flooring. Don't forget the electrical and plumbing!
Tips and Tricks for Building Success
Use quality materials: Don't cut corners on materials. Investing in quality lumber, fasteners, and other supplies will save you headaches and ensure a long-lasting structure.
Read the instructions: Take the time to read the manufacturer's instructions for your building materials. This will help you understand how to install them properly.
Ask for help: Building a pole barn is a big project, so don't be afraid to ask for help from friends or family. It's also a good idea to hire a professional for certain tasks, like concrete work or electrical wiring.
Take breaks: Building a pole barn is a lot of work, so don't forget to take breaks and stay hydrated. It's also important to take safety precautions and wear appropriate safety gear.
Let's Recap!
You've got this! Building a pole barn is a rewarding project that can give you a customized structure to suit your needs. With careful planning, quality materials, and a little elbow grease, you'll have a beautiful and functional pole barn in no time.
Remember, building a pole barn is a journey. Don't be afraid to ask questions, learn from your mistakes, and celebrate your achievements along the way. And most importantly, have fun!
How to Build a Simple Pole Barn with a Flat Roof

Hey there, building enthusiast! Ever dreamt of a simple pole barn? Maybe for your workshop, a storage space for your toys, or even a cozy hangout? Let's face it, a pole barn is the ultimate "I can do it myself" project. Sure, there's a little more to it than just hammering a few poles into the ground, but trust me, it's totally doable!
First things first, let's talk about the flat roof.
Flat roofs are super popular for pole barns because they're cheap and easy to install. No fancy angles or complicated rafters to worry about. But hold on, "flat" doesn't mean "completely flat". We're going for a slight slope here, maybe a 1/4" to 1/2" slope for every foot of roof. This little slope helps with drainage, keeping your barn dry and happy.
Now, let's outline the basic steps:
1. Planning and Permitting: Like any good construction project, we gotta start with a plan. Measure out your desired dimensions, sketch it out (don't worry, it doesn't have to be a masterpiece), and figure out exactly what you need. And don't forget, local building codes might have something to say about your pole barn dreams. Check with your local permitting department â€" they'll be your guide to navigating the legal landscape.
2. Foundation Frenzy: Think of this as the anchor for your barn. You've got a few choices here:
Concrete Piers: These are sturdy and will last you forever. They involve pouring concrete into forms dug into the ground.
Concrete Footings: For smaller barns, you can use concrete footings. These are basically concrete blocks set in the ground, and they provide a solid base for your poles.
Pressure-Treated Posts: This is the classic method â€" you're essentially digging holes and sinking pressure-treated posts directly into the ground.
3. Pole Power: Now we're getting to the heart of the matter â€" the poles! Choose sturdy lumber like pressure-treated pine or cedar. The size of your pole will depend on the size of your barn and local building codes. Make sure the poles are long enough to reach above the roofline â€" those will be your support beams.
4. Framing the Roof: Time to get those roof joists in place! You'll want to use strong lumber like 2x10 or 2x12. They'll span across the poles and form the base for your roof sheathing. Don't forget to create that gentle slope we talked about earlier â€" you can do this by adjusting the height of the joists.
5. Sheathing the Roof: Now we're covering the roof with a layer of plywood. This will provide a solid surface for your roofing material. Use sheets of exterior-grade plywood or OSB (oriented strand board). Make sure to secure them firmly to the joists with screws or nails.
6. Roofs, Roofs, Roofs!: Now comes the fun part â€" the roofing! For your pole barn, you've got some great options:
Metal Roofing: Super durable and affordable. Choose a color that complements your barn.
Asphalt Shingles: Classic look for a good price. Just make sure you choose a type specifically designed for flat roofs.
EPDM Rubber Membrane: A durable, waterproof option for your flat roof. It's also a great choice for environmentally conscious builders.
7. Siding, Walls, Doors, and Windows: Now you're ready to build those walls! You can use pre-made wall panels, or you can frame them yourself using studs and sheathing. Then, choose your siding:
Metal Siding: Affordable and easy to maintain.
Vinyl Siding: A popular choice for its low maintenance and variety of colors.
Wood Siding: Provides a rustic look, but requires more upkeep.
8. Finishing Touches: Now you're practically there! Finish up with the doors and windows, add some insulation to the walls and roof if you want to keep it cozy, and get ready to celebrate your new pole barn!
Let's get into some details:
Permits: Local building codes will be your best friend here. They'll dictate the minimum size of your foundation, the type of lumber you can use, and even the size of your roof overhang.
Foundation: Choosing the right foundation depends on your soil conditions and the weight of your barn. If you're in an area with clay soil, you might need concrete piers for extra support. If you're on solid ground, concrete footings or pressure-treated posts might be sufficient.
Pole Size: The size of your poles will depend on the size of your barn and the weight of your roof. Generally, 6x6 or 8x8 poles are used for most pole barns. But again, local building codes will have specific requirements.
Roof Slope: A gentle slope of 1/4" to 1/2" per foot is ideal for a flat roof, but you might need a steeper slope if you live in an area with heavy rainfall.
Roofing Material: Metal roofing is a popular choice for pole barns due to its durability, affordability, and ease of installation.
Siding: Metal or vinyl siding are great choices for pole barns. They're easy to maintain and come in a variety of colors.
Pro Tips:
Don't rush it: Take your time and make sure you're comfortable with each step before you move on.
Get help: Don't be afraid to ask for help from friends or family.
Stay organized: Keep your tools and materials organized, and label everything clearly.
Be safe: Wear safety glasses, gloves, and other safety gear when you're working. And always follow the manufacturer's instructions for any power tools or equipment you're using.
Building a pole barn is a challenging but rewarding project. It's a chance to get your hands dirty, learn new skills, and create something truly unique. And once you're finished, you'll have a brand new space to enjoy for years to come.
So what are you waiting for? Get out there and start building! Just remember, a little planning, a whole lot of passion, and maybe a helping hand or two will make your pole barn dreams a reality. Happy building!
How to Design and Build a Pole Barn for Outdoor Use

A pole barn, with its sturdy construction and versatility, offers a practical and cost-effective solution for various outdoor needs. Whether you envision a spacious workshop, a secure storage facility, or a sheltered recreational space, building a pole barn can transform your property. This comprehensive guide will walk you through the design and construction process, empowering you to create a custom-built pole barn tailored to your specific requirements.
I. Planning and Design:
1. Define Your Needs and Requirements:
Purpose: Clearly define the primary purpose of your pole barn. This will dictate its size, layout, and specific features.
Size and Dimensions: Determine the necessary footprint of the structure, considering its intended use and the size of equipment or vehicles to be stored.
Foundation Type: Explore the different foundation options â€" concrete piers, concrete slab, or gravel pads â€" and select the most suitable based on your budget, soil conditions, and local building codes.
Roof Style: Choose a roof style that complements the overall design and accommodates your specific needs. Popular options include gable, gambrel, or mono-pitched roofs.
Doors and Windows: Plan the placement and size of doors and windows for optimal access, ventilation, and natural light.
Utilities: Consider the need for electricity, plumbing, and heating or cooling systems based on your intended use.
2. Site Selection and Preparation:
Location: Choose a level site that allows for adequate drainage and complies with local building codes.
Clear the Area: Remove any obstacles, vegetation, or existing structures from the building site.
Utilities: Determine the availability and location of utilities (electricity, water, and gas) and plan for their connection to the pole barn.
Soil Testing: Conduct soil testing to evaluate the bearing capacity and determine the appropriate foundation design.
3. Design Considerations:
Local Building Codes: Familiarize yourself with local building codes, zoning regulations, and permit requirements.
Wind and Snow Loads: Factor in local wind and snow loads to ensure the structural integrity of your pole barn.
Environmental Impact: Consider the environmental impact of construction and material selection, choosing sustainable options whenever possible.
Accessibility: Ensure the pole barn is accessible for people with disabilities, adhering to relevant accessibility standards.
II. Materials and Construction:
1. Choosing the Right Materials:
Posts: Select strong and durable posts, such as pressure-treated lumber, steel poles, or concrete columns.
Framing: Opt for sturdy framing lumber, using engineered lumber for greater strength and stability.
Sheathing: Choose plywood or OSB sheathing for walls and roof for structural support and weather resistance.
Roofing: Select a durable roofing material like metal, asphalt shingles, or tile, taking into account the local climate.
Siding: Consider different siding options, such as metal, vinyl, or wood, to suit your aesthetic preferences and budget.
2. Constructing the Foundation:
Concrete Piers: This involves creating individual concrete piers to support the posts.
Concrete Slab: This option provides a solid, level surface for the building, but requires more materials and labor.
Gravel Pads: A less expensive option, but suitable only for lighter structures and dry conditions.
3. Erecting the Posts:
Placement and Leveling: Accurately position the posts on the foundation using a level.
Fastening: Secure the posts to the foundation using appropriate fasteners.
Bracing: Install bracing to ensure the stability of the posts and resist lateral loads.
4. Framing and Sheathing:
Wall Framing: Attach wall framing to the posts, creating a sturdy skeleton for the building.
Roof Framing: Construct the roof trusses or rafters, ensuring proper spacing and support.
Sheathing: Apply sheathing to the walls and roof, providing a surface for the siding and roofing materials.
5. Siding and Roofing:
Siding Installation: Install the siding, ensuring proper overlap and water-tight sealing.
Roofing Installation: Apply the roofing material, following the manufacturer's instructions for proper installation and sealing.
6. Finishing Touches:
Doors and Windows: Install the doors and windows, ensuring proper framing and weatherproofing.
Interior Finishes: Choose the desired interior finishes, such as drywall, insulation, and flooring.
Utilities: Install electrical wiring, plumbing, and heating or cooling systems as needed.
III. Safety and Regulations:
Construction Permits: Obtain all necessary permits from local authorities before starting construction.
Safety Precautions: Prioritize safety throughout the construction process, using appropriate personal protective equipment and following best practices.
Code Compliance: Ensure all aspects of the construction meet local building codes and standards.
Professional Assistance: Consider hiring a licensed contractor for complex tasks or structural components.
IV. Cost Considerations:
Material Costs: The cost of materials will vary depending on the size, features, and quality of the pole barn.
Labor Costs: Hiring professionals can significantly impact the overall cost, but may be necessary for specialized tasks.
Permit Fees: Obtain a clear understanding of permit fees and other associated costs.
Utilities and Finishes: Factor in the cost of utilities and interior finishes, if applicable.
V. Maintenance and Upkeep:
Regular Inspections: Conduct regular inspections to identify and address any potential maintenance issues.
Roof Maintenance: Inspect the roof for leaks or damage, and address any issues promptly.
Siding Maintenance: Clean and repair any damaged siding to maintain its aesthetic appeal and water resistance.
Foundation Maintenance: Inspect the foundation for cracks or settling and make necessary repairs.
Conclusion:
Building a pole barn requires careful planning, meticulous execution, and a commitment to safety. By understanding the design process, selecting appropriate materials, and adhering to local regulations, you can create a durable and functional structure that meets your unique needs. With proper planning and attention to detail, your pole barn will provide years of reliable service and add value to your property.
How to Create a Pole Barn with a Functional and Practical Layout
The allure of a pole barn lies not only in its rustic charm but also in its inherent functionality and cost-effectiveness. As a versatile structure, it can serve a multitude of purposes, from housing livestock and storing equipment to hosting workshops and recreational activities. To maximize its utility and ensure a seamless workflow, a thoughtful and practical layout is paramount. This guide will provide an in-depth exploration of the key considerations involved in designing a functional and efficient pole barn.
1. Defining Your Needs and Purpose:
The first step is to clearly define the primary purpose of your pole barn. This will dictate the overall layout and specific features you require. Ask yourself:
What will you store or house within the structure? Will it accommodate vehicles, livestock, machinery, workshops, or a combination of these?
What activities will take place inside? Will it be a workspace, a storage facility, a recreational space, or a combination?
What are your specific requirements for space and functionality? Do you need a separate area for workshops, a designated space for equipment storage, or a designated area for animals?
2. Site Selection and Considerations:
Choosing the right location is crucial for both functionality and aesthetics. Factors to consider include:
Accessibility: Ensure the site has easy access for vehicles, allowing for smooth transport of goods and materials.
Drainage: Adequate drainage is essential to prevent waterlogging and foundation issues.
Sunlight and Ventilation: Consider the amount of natural light and ventilation required based on the intended use.
Utilities: Assess the availability and accessibility of electricity, water, and gas connections.
Local Regulations: Consult local building codes and zoning regulations to ensure compliance.
3. Layout and Space Allocation:
The layout of your pole barn should prioritize efficiency and flow, minimizing wasted space and maximizing usability. Some key considerations include:
Clearance Heights: Determine the necessary height for storing vehicles, equipment, or housing animals comfortably. Consider adding extra height to the central area of the barn for large items or future modifications.
Walkways and Aisle Widths: Allocate sufficient space for easy movement throughout the barn. Aim for at least 4 feet of walkway width for comfortable traffic flow.
Doors and Windows: Strategically place doors and windows to optimize natural light, ventilation, and accessibility. Consider adding large sliding doors for vehicles or equipment.
Storage and Work Areas: Designate specific areas for equipment storage, tool benches, workshops, or other activities. Consider incorporating shelves, cabinets, and work surfaces to enhance organization and functionality.
Ventilation and Climate Control: Ensure proper ventilation to regulate temperature and humidity levels. If necessary, install fans, heating units, or cooling systems for optimal climate control.
Electrical Wiring and Lighting: Plan the placement of electrical outlets, lighting fixtures, and wiring systems to accommodate your specific needs.
Plumbing and Water Systems: If required, incorporate plumbing lines for water access, livestock watering systems, or bathroom facilities.
4. Materials and Construction:
Posts and Beams: Choose durable materials like pressure-treated lumber, steel, or concrete for the posts and beams. Ensure they are strong enough to support the weight of the roof and any additional loads.
Roofing: Consider the climate and your budget when selecting roofing materials. Metal roofs are durable and low-maintenance, while asphalt shingles offer cost-effectiveness.
Walls: Choose materials that provide adequate insulation and ventilation. Optionally, consider adding a layer of siding for aesthetic appeal and protection.
Flooring: Select a durable and moisture-resistant flooring material. Concrete floors are durable and easy to clean, while gravel or compacted dirt can be cost-effective for less demanding applications.
Insulation: Adding insulation to the walls and roof will improve energy efficiency and create a more comfortable environment.
Fire Safety: Install smoke detectors and fire extinguishers for safety. Consider a sprinkler system for additional protection.
5. Functionality and Practical Considerations:
Storage Solutions: Integrate efficient storage systems like shelves, racks, cabinets, and overhead storage units.
Workbenches and Lighting: Create dedicated workstations with sufficient lighting, power outlets, and storage.
Ventilation and Climate Control: Ensure proper ventilation, especially for areas with livestock or equipment that generates heat. Install fans and vents as needed.
Maintenance and Cleaning: Choose materials and design elements that are easy to clean and maintain. Consider incorporating drainage systems for areas prone to water accumulation.
6. Aesthetic Considerations:
While functionality is paramount, aesthetic appeal shouldn't be overlooked. Consider:
Exterior Finish: Choose a siding material that complements the surrounding environment and enhances the overall look of the pole barn.
Roof Color and Style: Select a roof color that complements the siding and the overall design. Consider using contrasting colors or materials for visual interest.
Doors and Windows: Choose door and window styles that complement the overall design. Consider using large windows for natural light and views.
Landscaping: Enhance the aesthetics of your pole barn by incorporating landscaping elements, such as trees, shrubs, and flowers.
7. Budgeting and Planning:
Cost Estimates: Obtain detailed cost estimates for materials, labor, and permits before starting construction.
Financing Options: Explore various financing options available for pole barn construction.
Timeline and Project Management: Create a detailed project plan outlining timelines, milestones, and budget allocation.
8. Permits and Inspections:
Building Permits: Obtain the necessary building permits from your local authorities.
Inspections: Schedule inspections throughout the construction process to ensure compliance with building codes.
Conclusion:
Building a pole barn with a functional and practical layout requires meticulous planning, attention to detail, and a thorough understanding of your needs. By following the guidelines presented in this guide, you can create a versatile structure that maximizes efficiency, minimizes wasted space, and enhances your productivity. With thoughtful design and careful execution, your pole barn will not only serve its intended purpose but also become a valuable asset for years to come.
How to Make a Pole Barn with a Sloping Roof for Rainwater Drainage

Alright, so you're thinking about building a pole barn, huh? That's a great choice! They're super versatile, perfect for workshops, garages, storage, and even living spaces. But you're also thinking about that roof, and you're smart to consider it. A sloping roof is the way to go, especially if you get a lot of rain. It'll keep your barn dry, and you'll be able to enjoy it for years to come.
Let's talk about building your pole barn with a sloping roof. Don't worry, I'll break it down step by step. It's actually a lot easier than you might think.
## Planning the Roof: The Foundation of Your Design
First things first, you gotta plan your roof. Think of it as the foundation of your design â€" get it right, and the whole barn will come together beautifully.
Slope is Key: The slope of your roof is the most important part. You want a slope that's steep enough to shed water quickly, preventing leaks and damage. A good general rule is a 4/12 pitch, which means for every 12 inches of horizontal run, the roof rises 4 inches. That's a nice, gentle slope that does the job without looking too dramatic.
Roof Length and Width: The length and width of your barn will determine the size and materials you need for the roof. Get your measurements right, and you'll avoid headaches down the road.
Materials: There are different types of roofing materials to choose from. Metal roofing is popular for pole barns because it's durable, low-maintenance, and fire-resistant. But you can also go with shingles, which are more traditional and affordable.
## Building the Roof: It's Like Building a Giant Puzzle!
Now, it's time to start building your roof. This part might seem a bit daunting, but it's really just putting together a giant puzzle, piece by piece.
The Framing: You'll need strong beams and trusses to support the roof. You'll often use steel or wood for these. Steel trusses are really strong, but wood is a little more affordable. And, it's easier to work with for DIYers.
Sheathing: This is the base layer of your roof. You'll attach it to the trusses, creating a solid foundation for the roofing material. Plywood sheathing is a common choice, but you can also use OSB (oriented strand board).
Underlayment: This is a waterproof layer that goes on top of the sheathing. It adds extra protection against leaks and moisture. Felt paper is a popular option, but there are also synthetic options that are more durable and weather-resistant.
The Roofing Material: This is the final layer and the one that gives your roof its distinctive look. Install the roofing material according to the manufacturer's instructions. You'll probably need a couple of helpers for this part, as roofing sheets can be quite heavy.
## Finishing Touches: Adding the Extras
Once the main roof is in place, you can add those finishing touches that make your barn really special.
Gutters and Downspouts: These are essential for channeling rainwater away from your barn. Make sure you install them properly so they can do their job efficiently.
Vents: Ventilation is important for keeping your barn well-ventilated and preventing moisture build-up. You can install vents in the roof or in the walls.
Skylights: If you want to bring natural light into your barn, you can add skylights. Just make sure they're well-sealed and weatherproof.
## DIY or Hire a Pro?
Building a pole barn with a sloping roof is definitely a big project. You can do it yourself, but it's definitely a lot of work. If you're not confident in your DIY skills, it's always best to hire a professional.
DIY Advantages: You save money, and you get to do it yourself! You'll have a sense of accomplishment and satisfaction knowing you built it with your own two hands.
Hiring a Pro Advantages: You can relax and let the experts do the work, knowing it's done right. They have the experience and the equipment to get the job done safely and efficiently.
## The Reward: Your Dream Pole Barn
No matter how you choose to build your pole barn, you'll be rewarded with a sturdy, beautiful, and functional structure. A sloping roof will ensure it stays dry and comfortable for years to come.
So get out there, grab your tools, and start building your dream pole barn! You've got this!
How to Design a Pole Barn for Your Business or Farm

A pole barn, also known as a post-frame building, is a versatile and cost-effective construction method ideal for various commercial and agricultural applications. Its unique structural design, featuring heavy-duty posts supporting a roof and walls, provides durability, affordability, and flexibility. This guide will delve into the key aspects of designing a pole barn for your business or farm, ensuring you make informed decisions throughout the process.
1. Defining Your Requirements:
Purpose: Clearly define the intended use of the pole barn. This could be for storage, workshops, livestock housing, equipment maintenance, retail space, or a combination of purposes.
Size and Layout: Determine the necessary square footage and optimal layout to accommodate your equipment, livestock, or business operations. Consider future expansion needs and the flow of traffic within the structure.
Environmental Considerations: Analyze site conditions, including soil type, drainage, wind load, and snow load. These factors will influence the design of the foundation, roof, and walls.
Budget: Establish a realistic budget and allocate funds for materials, labor, permits, and potential future upgrades.
2. Selecting the Right Foundation:
The foundation forms the base of the pole barn and dictates its longevity. Common foundation types include:
Concrete Piers: Concrete piers are cost-effective and suitable for well-drained soils. They are installed directly into the ground and support the posts.
Concrete Slab: A concrete slab provides a solid foundation and is ideal for structures that require a level floor. However, it can be more expensive than piers.
Grouted Posts: This method involves directly embedding the posts in concrete grout, creating a sturdy and durable connection to the ground.
The choice of foundation depends on site conditions, budget constraints, and the intended use of the pole barn. Consult with a structural engineer for expert advice on foundation design.
3. Choosing the Perfect Posts and Framing:
Post Material: Typically, pressure-treated lumber is used for posts due to its resistance to decay and insects. Other options include steel and concrete, depending on the desired structural integrity and budget.
Post Size: Post size depends on the span between posts, roof load, and wind load. Consult with a structural engineer to determine the appropriate post dimensions.
Framing: The roof and walls are typically framed with engineered wood products like I-beams or trusses, offering strength and efficient construction.
4. Roof Design and Considerations:
Roof Style: Common roof styles for pole barns include gable, hip, and gambrel. Each offers different advantages in terms of drainage, aesthetics, and snow load capacity.
Roofing Material: Consider factors like cost, durability, maintenance requirements, and desired aesthetics when selecting roofing materials. Options include metal roofing, asphalt shingles, and standing seam metal.
Ventilation: Proper ventilation is crucial to prevent moisture buildup, ensuring a healthy environment for livestock, equipment, or storage.
5. Wall Construction and Insulation:
Wall Material: Pole barns offer flexibility in wall construction, from traditional wood sheathing to insulated metal panels.
Insulation: Depending on the purpose of the barn and climate, consider insulation to maintain comfortable temperatures, reduce energy consumption, and improve soundproofing.
Doors and Windows: Choose appropriately sized doors and windows to facilitate access, ventilation, and natural light.
6. Electrical and Plumbing Systems:
Electrical: Install adequate electrical systems to power lighting, equipment, and other necessary appliances. Consider the placement of outlets, switches, and lighting fixtures.
Plumbing: If plumbing is required for livestock watering, wash stations, or other uses, design the system with proper drainage and sanitation.
7. Building Codes and Permits:
Ensure your pole barn design complies with local building codes and regulations. Obtain the necessary permits before starting construction. This may involve submitting drawings, specifications, and detailed plans to local authorities.
8. Professional Assistance:
For complex or large-scale projects, consider hiring a professional architect or engineer to assist with design and structural calculations. Their expertise can ensure the pole barn meets all safety standards and your specific requirements.
9. Additional Features:
Lighting: Consider the type and placement of lighting based on the intended use. Choose energy-efficient options for reduced operating costs.
Storage Solutions: Implement efficient storage solutions for tools, equipment, supplies, and other materials.
Safety Features: Incorporate safety features like fire extinguishers, smoke detectors, and emergency exits.
10. Maintenance and Upkeep:
Regular maintenance is crucial for the longevity of your pole barn. This includes:
Roof Inspection: Inspect the roof for leaks, damaged shingles, or debris buildup.
Post Inspection: Check for signs of rot, decay, or structural weakness in the posts.
Wall Inspection: Look for cracks, damage, or leaks in the walls.
Foundation Inspection: Inspect the foundation for cracks, settling, or water damage.
Conclusion:
Designing a pole barn is a comprehensive process requiring careful planning and attention to detail. By understanding your requirements, selecting the right materials, and consulting with professionals when needed, you can create a durable, cost-effective, and functional structure for your business or farm. A well-designed pole barn will serve you for years to come, providing a safe and efficient space for your operations.