Sunday, 19 January 2025
Shed building hacks for first-time DIYers

Conquer Your First Shed Build: Smart Hacks for DIY Beginners
Building your own shed is a rewarding experience, offering a sense of accomplishment and a customized storage solution. But for first-time DIYers, it can seem daunting. This guide breaks down the process into manageable steps, offering clever hacks to simplify construction and avoid common pitfalls. Forget the overwhelming feeling of staring at a pile of lumber; let's get you building!
Planning is Your Secret Weapon
Before you even think about touching a nail, thorough planning is crucial. This isn't about creating complex architectural drawings; it's about laying a solid foundation for success. Start by determining the shed's purpose: Will it store gardening tools, bikes, or something else? This dictates the size and features you need. Next, sketch a simple plan, noting dimensions and materials. Measure twice, cut once â€" this age-old adage is especially relevant here. Accurate measurements prevent costly mistakes and wasted materials later on.
Master the Art of the Simple Plan
Don't overcomplicate your design. A simple rectangular shed is perfectly acceptable for a first-time builder. Focus on creating a solid, weather-resistant structure. You can always add decorative elements later. Use readily available materials like pressure-treated lumber for longevity and ease of use.
Foundation Fundamentals: Setting the Stage for Success
A strong foundation is paramount for a stable shed. Don't skimp on this step. Choose a level location, preferably a slightly elevated spot to prevent waterlogging. Consider a concrete slab for ultimate stability, but a simpler gravel base works well too. Level the ground meticulously using a spirit level and adjust the gravel or concrete base accordingly. Remember: a slightly uneven foundation will translate into a wobbly shed.
Choosing the Right Foundation
For beginners, a gravel base is often the easiest and most cost-effective option. Simply level the ground, lay down a layer of landscape fabric (to prevent weeds), then compact a layer of gravel. Ensure it's level by using a long level and adjusting the gravel as needed. If you opt for concrete, consider renting a concrete mixer to make the job easier and ensure proper mixing.
Smart Building Techniques: Hacks for Easier Construction
Building a shed is all about assembling components. To make the process smoother, utilize simple but effective techniques. Pre-drill holes before driving screws â€" this prevents the wood from splitting, especially with pressure-treated lumber. Use a speed square to ensure accurate cuts and square corners. Invest in a good quality level â€" this is one tool you'll use repeatedly. Consider using a cordless drill for faster and easier screw driving. It will save you time and energy.
Embrace Pre-Assembled Kits
If you're feeling overwhelmed by the prospect of cutting all the wood yourself, consider purchasing a shed kit. These pre-cut kits significantly simplify the process, providing pre-cut lumber and detailed instructions. While slightly more expensive, the ease and reduced risk of errors make them an excellent option for first-timers.
Finishing Touches and Beyond
Once your shed’s structure is complete, focus on weatherproofing. Apply a quality wood preservative to protect the lumber from rot and insect damage. Consider adding a roof covering for protection from the elements. Finally, install a sturdy door and any necessary hardware. Celebrate your accomplishment! You’ve successfully built your own shed. Now enjoy your new storage space, and admire the fruits of your labor.
Personalizing Your Shed
Add your personal touch! Paint the shed your favorite color, add windows for extra light, or install shelves for better organization. The possibilities are endless. Your newly built shed is a reflection of your hard work and creativity, so make it uniquely yours.
Easy shed layout tips for beginner builders

Building Your Dream Shed: Simple Layout Tips for Beginners
Building a shed can seem daunting, but with a well-planned layout, it becomes a manageable and rewarding project. This guide provides essential layout tips specifically designed for beginner shed builders, ensuring a smooth construction process and a functional, attractive finished product. Forget those complicated blueprints; we'll focus on simple, effective strategies to design your perfect storage solution.
Planning Your Shed's Purpose and Size
Before you even think about tools, you must define your shed's purpose. What will you store inside? Will it house gardening equipment, power tools, bicycles, or a combination? Knowing the contents dictates the necessary size and internal layout. Consider measuring your intended belongings; this will give you a realistic estimate of the required floor space. Don't underestimate the space you'll need â€" it's always better to have a bit extra than to find yourself cramped for room later on. Sketch a simple floor plan to visualize the arrangement of your stored items. A small, detailed sketch is far more helpful than relying on memory during construction.
Optimizing Your Shed's Interior
Efficient interior layout maximizes space and usability. Think vertically! Maximize wall space with shelves for smaller items and consider installing hooks for tools and other hanging items. This keeps things off the floor, creating more walking space. If you plan to store taller items, ensure sufficient headroom. Don't forget about accessibility: you need enough space to easily move around and reach everything you need. For example, place frequently used items within easy reach, avoiding the need to reach over or crawl under things.
Smart Shelving and Storage Solutions
Shelving is your friend! Consider adjustable shelving to accommodate items of varying heights. This provides incredible flexibility as your needs change over time. Also think about using pegboards for hanging tools â€" it creates a visually appealing and organized wall space. For larger items, use sturdy wooden beams or metal racks to create defined areas for storage. You can even use repurposed materials like old pallets to build shelves â€" this can add a unique character to your shed and save you money.
Door Placement and Access
The location of your shed door is crucial for ease of access and convenience. Avoid placing the door where it will obstruct pathways or impede access to other areas. Consider the prevailing wind direction â€" you don't want a door constantly blowing open. If you’re working with a single door, ensure it opens outwards to prevent accidentally trapping yourself inside. A double door can offer wider access, particularly if you'll be moving in larger equipment.
Light and Ventilation
Don't overlook the importance of natural light and ventilation. Adequate lighting prevents accidents and makes the shed more pleasant to use. A single window on the side or back wall can dramatically improve the lighting. Good ventilation is equally crucial to prevent moisture build-up and mold growth. You can achieve this by adding vents or louvers on opposite walls to create airflow. Installing a simple exhaust fan can greatly enhance ventilation in areas with higher humidity.
By following these simple layout tips, you’ll be well on your way to building a functional and enjoyable shed. Remember, planning is key, so take your time and enjoy the process!
Friday, 22 November 2024
DIY Pallet Shed: How to Build a Shed Using Reclaimed Pallets
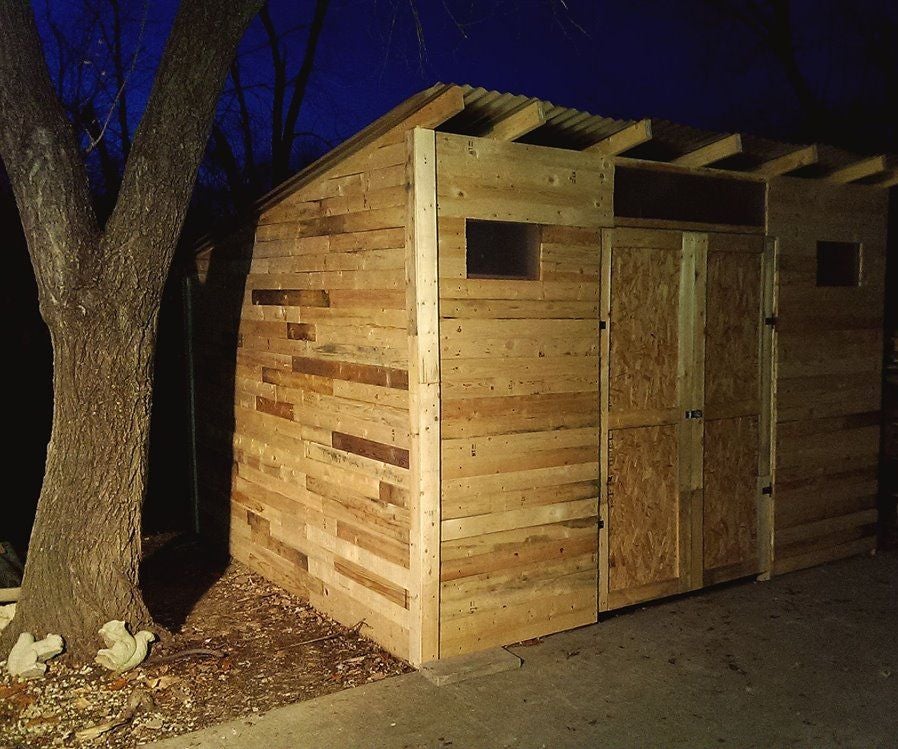
DIY Pallet Shed: A Comprehensive Guide to Constructing a Shed from Reclaimed Pallets
Constructing a shed from reclaimed pallets presents a cost-effective and environmentally conscious alternative to purchasing a pre-fabricated structure. This guide provides a detailed, step-by-step process for building a functional and aesthetically pleasing shed utilizing this readily available material. However, it is crucial to acknowledge that using reclaimed pallets introduces certain challenges and considerations that require careful planning and execution.
Phase 1: Planning and Preparation
Before embarking on the construction process, meticulous planning is paramount. This phase encompasses several key aspects that will significantly impact the final outcome and the overall success of the project.
Shed Design and Dimensions
The first step involves determining the desired dimensions of your pallet shed. Consider the intended use of the shed, the available space in your yard, and the number of pallets you have at your disposal. A detailed sketch or blueprint, even a simple one, will be invaluable throughout the construction process. Consider factors such as door placement, window placement (if desired), and roof pitch. Accurate measurements are critical to ensure proper fitting of the pallets and to avoid structural issues.
Pallet Assessment and Selection
Not all pallets are created equal. Inspect your reclaimed pallets carefully for damage, rot, infestation, and structural integrity. Discard any pallets showing signs of significant damage or decay. Prioritize pallets of consistent dimensions and quality for a more straightforward construction process. The condition of the pallets will directly influence the durability and longevity of your shed. Ensure the wood is relatively sound and free from splinters that could pose a safety hazard. The dimensions of the pallets are important; selecting pallets with consistent size simplifies construction greatly.
Materials Acquisition and Tool Preparation
Beyond the pallets themselves, you will require additional materials to complete the project. These include: concrete or other foundation materials, screws and nails, wood for framing or reinforcement (where needed), roofing material (e.g., asphalt shingles, corrugated metal), and any desired finishing materials (e.g., paint, sealant). Gather all necessary tools before commencing construction. This may include a hammer, screwdriver, drill, saw (circular saw or hand saw), measuring tape, level, safety glasses, work gloves, and potentially a post hole digger if you opt for a post and beam foundation.
Phase 2: Foundation Construction
A stable foundation is crucial for the longevity and structural integrity of your pallet shed. Several foundation options exist, each with its own advantages and disadvantages.
Concrete Slab Foundation
A concrete slab provides the most stable and durable foundation, offering excellent protection from moisture and pests. However, it requires more effort and expertise to pour and level. Ensure you obtain necessary permits before undertaking this method. A level and compacted base is crucial before pouring the concrete. Allow ample curing time for the concrete before proceeding with the shed construction.
Gravel Base Foundation
A gravel base offers a simpler and more affordable foundation option. It involves leveling the ground, laying down a layer of gravel, and compacting it thoroughly. While less stable than a concrete slab, a properly constructed gravel base can provide adequate support, especially on well-drained soil. This is suitable for lighter sheds and may not be sufficient in all soil conditions.
Post and Beam Foundation
A post and beam foundation consists of setting pressure-treated posts into the ground to support the shed's base. This method requires digging holes, setting the posts using concrete, and then constructing a framework using pressure-treated lumber on top. This can be a viable option in areas where ground conditions are less than ideal or where the ground is sloped.
Phase 3: Shed Construction
With the foundation completed, the process of assembling the shed using reclaimed pallets can begin. This stage requires patience, attention to detail, and the implementation of safe work practices.
Pallet Assembly and Wall Construction
Begin by assembling the pallet walls. Depending on the size and design of your shed, you may need to cut or modify some pallets to achieve the desired dimensions. Secure the pallets together using screws or nails, ensuring a strong and stable connection. Consider using additional wood framing to reinforce the structure and provide added stability. Use pressure-treated lumber for any ground-contacting components of the structure.
Floor Construction
The floor can be constructed using additional pallets or by building a framework from lumber and covering it with plywood or other suitable flooring material. Ensure the floor is level and securely fastened to the foundation or frame. Consider adding a vapor barrier beneath the flooring to protect against moisture.
Roof Construction
The roof design depends on your chosen shed design. It could be a simple gable roof, a shed roof, or other more complex design. Construct the roof frame using lumber and secure the roofing material. Ensure proper overhang to protect the walls from rain and weather. Use appropriate roofing materials suited for your climate and budget.
Door and Window Installation (If Applicable)
Install doors and windows (if desired) ensuring a snug fit and proper weatherproofing. Use high-quality hinges and locking mechanisms. For windows, consider using plexiglass or other weather-resistant materials. The door and window placement should have been pre-planned in the design phase.
Phase 4: Finishing Touches and Safety Considerations
Once the primary structure is complete, attention should be given to finishing touches and safety measures.
Weatherproofing and Sealing
Apply a suitable wood sealant or preservative to protect the pallets from moisture damage and extend the lifespan of your shed. Pay particular attention to joints and seams. Consider painting or staining the shed for additional protection and aesthetic appeal.
Safety Precautions
Throughout the entire construction process, prioritize safety. Wear appropriate safety gear including safety glasses, work gloves, and sturdy footwear. Use caution when handling tools and power equipment. Ensure proper ventilation if working with paints or solvents. Inspect the shed regularly for any potential hazards or signs of damage.
Building a shed from reclaimed pallets is a rewarding project that offers significant cost savings and environmental benefits. However, careful planning, meticulous execution, and a commitment to safety are essential for a successful outcome. This detailed guide provides a solid foundation for undertaking this project. Remember to adapt these instructions to your specific design and material availability.
Thursday, 21 November 2024
How to Make a Strong and Reliable DIY Pallet Shed: Step-by-Step Guide

Building a Strong and Reliable DIY Pallet Shed: A Step-by-Step Guide
Transform discarded pallets into a sturdy and functional shed with this comprehensive guide. We'll walk you through each stage, ensuring your new storage solution is both robust and aesthetically pleasing. Forget flimsy structures; this guide empowers you to build a shed that will stand the test of time and weather.
1. Planning and Preparation: Laying the Foundation for Success
Before you even touch a pallet, meticulous planning is key. Start by determining the desired dimensions of your shed. Consider the space available and the items you plan to store. Sketch a simple design, noting the placement of doors, windows (if desired), and any internal shelving. Next, gather your materials. This includes a sufficient quantity of reclaimed pallets â€" inspect each carefully for rot, damage, and loose nails; you need sturdy ones for a robust build. You’ll also need: strong screws (consider exterior-grade galvanized screws for longevity), pressure-treated lumber for the base and supports (if needed), roofing materials (metal, asphalt shingles, or corrugated plastic), and any desired hardware like hinges, handles, and locks. Don’t forget safety gear â€" work gloves, safety glasses, and a sturdy work apron are essential.
Choosing the Right Pallets
Not all pallets are created equal. Look for pallets made of sturdy hardwood, avoiding those with significant damage or signs of pest infestation. Heat-treated pallets are preferable to chemically treated ones, ensuring safety and longevity. The more uniform your pallets are in size and condition, the easier the construction process will be.
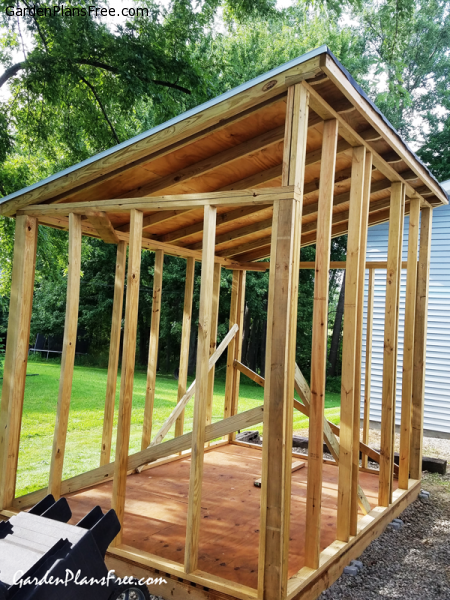
2. Building the Foundation: A Stable Base for Your Shed
A solid foundation is paramount for a long-lasting shed. Begin by leveling the ground where your shed will stand. Use a shovel and level to create a flat, even surface. You can opt for a simple gravel base for drainage, or for a more permanent solution, lay down a concrete slab or a sturdy wooden frame supported by pressure-treated lumber footings. This base will prevent settling and protect your shed’s structure from ground moisture. Once your base is secure, you can start assembling the pallet walls.
3. Constructing the Walls: Assembling the Pallet Framework
Carefully dismantle the selected pallets, removing any loose or damaged boards. Clean the remaining boards thoroughly, removing any debris or loose nails. Now, begin constructing the walls using the reclaimed boards. You can create a frame using the stronger pallet beams and then fill in the gaps with the remaining boards. Ensure the boards are securely fastened with screws, paying close attention to alignment and stability. Construct each wall separately, ensuring they are all the same height and width before moving to the next step. For added strength, consider using additional pressure-treated lumber for vertical supports inside the pallet walls.
Securing the Walls
Once your walls are constructed, stand them upright and secure them together using strong bracing and additional screws. Ensure the corners are square and the walls are plumb (perfectly vertical). Consider using long screws to penetrate deep into the pallet wood, maximizing the strength of the joints. A well-secured framework is the cornerstone of a resilient shed.
4. Adding the Roof: Protecting Your Investment from the Elements
Construct a roof frame using pressure-treated lumber, ensuring it's strong enough to support your chosen roofing material. The roof design can be simple â€" a gable roof is both practical and visually appealing. Attach the roof frame securely to the top of your pallet walls using more screws. Then, carefully install your roofing material, following the manufacturer’s instructions. Whether you choose metal sheeting, asphalt shingles, or corrugated plastic, ensure a waterproof seal to protect your belongings from rain and snow.
5. Finishing Touches: Adding Doors, Windows, and Final Details
Install a door using pressure-treated lumber and hinges. Ensure the door fits snugly and closes securely. You can add windows for natural light and ventilation, using plexiglass or similar transparent material. Finish the interior with shelving made from additional pallets or lumber, optimizing storage space. Apply a protective exterior sealant to all wooden surfaces to increase weather resistance and longevity. Finally, consider adding a coat of paint or stain to enhance the aesthetics of your pallet shed.
Congratulations! You’ve successfully built a robust and reliable DIY pallet shed. This guide provides a solid foundation for your project. Remember, careful planning and meticulous execution are key to achieving a durable and attractive structure that will serve you well for years to come.
How to Build a Wood Pallet Shed: Step-by-Step for DIY Beginners
Building Your Own Wood Pallet Shed: A Beginner's Guide
Hey there, fellow DIY enthusiasts! So, you're thinking about building a shed? Awesome! And you want to use reclaimed pallets? Even better! Building a shed from reclaimed wood pallets is a fantastically budget-friendly and environmentally conscious project. It’s a great way to upcycle and create something truly unique. This guide will walk you through the process, step-by-step, so even if you're a complete beginner, you can confidently tackle this project. Let’s get started!
1. Planning and Preparation: Laying the Foundation
Before you even think about hammering a nail, some planning is crucial. This isn't rocket science, but a little preparation goes a long way in preventing headaches down the line.
1.1 Choosing Your Pallets
Not all pallets are created equal! You need to find pallets that are sturdy and in relatively good condition. Look for pallets made of hardwood (like oak or pine) â€" they're more durable and less likely to rot. Avoid pallets that show signs of significant damage, rot, or pest infestation. Important: Always check for any markings indicating the presence of hazardous materials â€" you don’t want to be working with treated lumber unless you're specifically equipped for it.
1.2 Gathering Your Tools and Materials
You'll need a basic set of tools for this project. Don't worry, you likely have some of them already! Here’s a list:
- Hammer
- Measuring tape
- Level
- Saw (circular saw is ideal, but a hand saw will work in a pinch)
- Drill with various drill bits
- Screws (various lengths, depending on the pallet thickness)
- Safety Glasses
- Work gloves
- Optional: Nail gun (makes things much faster!)
- Post hole digger (or shovel) and concrete (for a more permanent base)
As for materials, besides the pallets themselves, you might need some additional lumber for reinforcement, roof supports, and any extra framing needed. This will depend on your shed design.
1.3 Designing Your Shed
Sketch out a basic design! Think about the size you need, the overall shape (a simple rectangle is easiest for beginners), and any features you want to include (like a door or a small window). Remember that pallets are usually around 48 inches long and 40 inches wide, so your design should factor that in for easy assembly. You can also search online for pallet shed plans for inspiration.
2. Building the Frame: The Foundation of Your Shed
With your plans in hand and materials gathered, it's time to start building the frame. This is where the bulk of the construction happens. Remember to take your time and be precise â€" a well-built frame makes for a strong and stable shed.
2.1 Base Construction
Decide on your base. A simple gravel base is easy for beginners. For a more permanent solution, dig post holes in the corners, set posts in concrete, and then build a frame on top of the posts using more lumber. This creates a solid, level foundation.
2.2 The Walls
You can assemble the walls directly on the ground, which makes it easier to lift them into place. The best way to create walls is to use the best sides of the pallets â€" the cleaner the better â€" and secure them together. You might need to cut some pallets for better sizing and add extra supports or bracing for strength. It's perfectly fine to use a combination of screws and nails.
2.3 Connecting the Walls
Once the walls are built, carefully lift and connect them. Make sure everything is square and level before securing them to each other. Use longer screws or additional bracing to ensure a strong connection.
3. Roofing the Shed: Keeping the Elements Out
Now for the roof! This part requires a bit more careful planning and precision, but it's completely doable.
3.1 Roof Framing
Depending on your design, you might need to create a simple gable roof (triangular) or a shed roof (single slope). Use extra lumber to build rafters that extend from the top of the walls to the center point. Make sure the rafters are well-secured and properly spaced.
3.2 Roofing Material
Your choice of roofing material depends on your budget and preferences. You could use more reclaimed wood (if you can find suitable planks), tar paper, or even inexpensive roofing felt. A layer of waterproof roofing felt is recommended over pallets to prevent leaks. Make sure to overlap the sheets and secure them properly to avoid any water ingress.
4. Finishing Touches: Adding the Extras
With the main structure complete, it's time to add those finishing touches that will transform your pallet shed from functional to fantastic!
4.1 Doors and Windows
You can create a door using more pallets or purchase a pre-made door of a suitable size. Similarly, you can add windows for ventilation and light; simple window frames can be made from additional lumber or even repurposed materials. You can seal any gaps with sealant to keep out drafts and insects.
4.2 Paint and Stain
This is where you can really personalize your shed! A coat of paint or stain not only protects the wood from the elements but also dramatically improves the aesthetics. Choose colours that complement your outdoor space. Always use a high-quality exterior paint or stain designed for wood. If you do not plan to use paint or stain, you should seal the wood with a waterproof sealant to ensure longevity.
5. Safety First! Always Remember These Tips
- Wear safety glasses and gloves at all times to protect yourself from splinters and injuries.
- Use caution when working with power tools. Make sure you know how to use them safely and correctly.
- Work in a well-ventilated area, especially when using paint or stain.
- Take breaks to avoid fatigue and maintain focus.
- Never work alone on a large project. Ask for help if you need it.
Commonly Asked Questions
Here are some questions frequently asked about building a pallet shed:
Q: How long does it take to build a pallet shed?
A: The timeframe varies greatly depending on the shed's size and complexity, as well as your DIY experience. A simple small shed might take a weekend, while a larger, more intricate project could take several weekends.
Q: How much does it cost to build a pallet shed?
A: The cost is primarily determined by the additional materials you need (lumber, roofing, screws, paint, etc.). Since pallets are free or very inexpensive, the overall cost can be significantly lower than a pre-fabricated shed.
Q: Are pallet sheds durable?
A: The durability depends on the quality of the pallets you use and how well the shed is constructed. Using strong hardwood pallets and proper construction techniques will result in a long-lasting shed. Regular maintenance and protection from the elements will also extend its lifespan.
Q: What kind of permits do I need?
A: Building codes and permit requirements vary by location. Check with your local authorities before starting construction to ensure you're complying with all regulations.
Building a pallet shed is a rewarding project that combines creativity, resourcefulness, and a little bit of elbow grease. With careful planning and execution, you can create a beautiful and functional addition to your property. So, grab those pallets, gather your tools, and let the building begin!
How to Make a Reliable Wood Pallet Shed for Your Garden Tools

Building Your Dream Garden Tool Shed from Reclaimed Pallets: A Step-by-Step Guide
Hey there, fellow gardening enthusiasts! So, you've got a pile of garden tools threatening to take over your patio, and you're dreaming of a neat little shed? Well, guess what? You don't need to shell out a fortune for a pre-built one. We're diving into how to build a reliable, rustic, and totally charming garden tool shed using reclaimed wood pallets! It might sound a bit daunting, but trust me, it's more achievable than you think. Let's get our hands dirty!1. Planning & Preparation: Laying the Groundwork for Success
Before we even THINK about hammering a nail, let's get organized. This is the crucial bit that'll save you headaches (and potentially, some splinters) later on.1.1 Choosing Your Pallets:
This is where the fun begins! Sourcing your pallets is half the adventure. Look for pallets that are sturdy, free of rot or excessive damage, and ideally, heat-treated (HT) or marked with the IPPC stamp. These markings indicate they're safe for use. Avoid pallets that show signs of insect infestation or chemical treatment. Check your local recycling centers, construction sites (with permission, of course!), or even ask around your neighborhood â€" you might be surprised how many people are happy to get rid of their old pallets!
1.2 Designing Your Shed:
Grab a pencil and paper (or fire up your favorite design app!). Sketch out your shed's dimensions. Think about how much storage space you need, the overall size that will fit comfortably in your garden, and the style you're going for. A simple rectangular shed is a great starting point for beginners. Remember to consider the height â€" you need enough room to comfortably reach your tools. I'd recommend starting with a plan that's no more complex than what you feel comfortable building. Don't get too ambitious for your first project!
1.3 Gathering Your Tools & Materials:
Besides your reclaimed pallets, you'll need a few essential tools and materials. Don't worry, it's not an exhaustive list for a basic shed. You might already have some of these at home!
- Measuring tape
- Level
- Hammer
- Screws (exterior-grade, longer ones for more strength)
- Drill (with drill bits appropriate for the screws)
- Safety glasses
- Work gloves
- Crowbar (to dismantle pallets)
- Post hole digger (or shovel)
- Concrete mix (for posts)
- Wooden posts (pressure-treated for ground contact)
- Optional: Saw (for cutting pallets to size)
- Optional: Paint or stain (to protect the wood)
2. Construction: Building Your Pallet Haven
Alright, let's build! Remember to always prioritize safety. Wear your safety glasses and gloves throughout the entire process.2.1 Preparing the Base:
First, you'll need a solid foundation. Dig four post holes in the corners of your designated area, ensuring they're deep enough (check local frost levels) and evenly spaced. Set your pressure-treated wooden posts in the holes, ensuring they’re plumb (perfectly vertical) using your level. Fill the holes with concrete mix, and let it set completely according to the instructions on the packaging. This gives your shed the stability it needs to withstand the elements.
2.2 Assembling the Frame:
Once the concrete has set, you can start constructing the frame of your shed. This is where you might need to cut some pallets to size depending on your design. Carefully dismantle the pallets, separating the usable planks. Attach the planks to the posts using screws, creating a strong and square frame. Remember to double-check your measurements and use your level frequently to keep everything straight and level.
2.3 Adding the Walls & Roof:
Now for the fun part â€" creating the walls! Here's where you’ll get creative. You can simply attach the remaining pallet sections to the frame, creating a rustic look. You might need to creatively arrange the planks, and you may need to cut some to fit perfectly. For the roof, you can build a simple gable roof using more reclaimed wood, or even opt for a simple flat roof. Again, carefully secure everything with screws for maximum strength and stability.
2.4 Adding Doors & Windows (Optional):
You can add a simple door using more reclaimed wood or even an old door you might have lying around. For windows, you can get creative with cutouts or add some repurposed window frames. Remember to secure these elements carefully to the shed’s structure.
2.5 Finishing Touches:
Once the structure is complete, you can add your personal touch. Consider applying a wood sealant or paint to protect the wood from the elements and enhance its appearance. You can also add a gravel or paved floor for easier cleaning and to prevent moisture from seeping into the base.
3. Maintenance & Care: Keeping Your Shed in Tip-Top Shape
Your hard work deserves to last! Regular maintenance will keep your pallet shed looking good and functioning for years to come. Consider these steps:
- Regularly inspect your shed: Check for any loose screws, damaged planks, or signs of insect infestation.
- Apply a fresh coat of sealant or paint as needed: This protects the wood from moisture and UV damage.
- Keep the area around your shed clean and clear of debris: This helps prevent moisture build-up and pest problems.
- Consider adding ventilation: This helps prevent moisture build-up inside the shed, particularly if you’re storing items that might retain moisture.
Frequently Asked Questions
Q: How long does it take to build a pallet shed?
A: This depends on your experience and the complexity of your design. A simple shed could take a weekend, while a more elaborate one might take longer. Allow ample time, don't rush it, and remember that quality over speed is key!
Q: Are all pallets safe to use?
A: No. Avoid pallets treated with chemicals. Look for HT or IPPC markings, indicating they’re safe for use.
Q: How do I make the shed waterproof?
A: Using a good quality exterior-grade wood sealant or paint is crucial. You can also consider adding a roof overhang to help protect the walls from rain. A well-sealed base will also help protect the shed from moisture.
Q: Can I use this shed for storing heavier items?
A: The strength of your shed will depend on the quality of the pallets and the construction. For heavier items, you may want to reinforce the frame and floor. It's always better to err on the side of caution.
Q: What if I don't have any woodworking experience?
A: Don't worry! Start with a simple design and take your time. There are plenty of online resources and tutorials available to help guide you through each step. Don't be afraid to ask for help from a friend or family member if needed!
There you have it! Building your own pallet shed is a rewarding project that will add both functionality and charm to your garden. Happy building!DIY Lean-To Shed: Build a Practical Shed with Minimal Investment
DIY Lean-To Shed: Build a Practical Shed with Minimal Investment
Hey there, folks! So you're looking to build a shed, huh? That's awesome! A shed can be a lifesaver for storing garden tools, bikes, or even just that overflowing pile of stuff you've been meaning to organize for… well, let's not dwell on that. The problem is, sheds can be expensive! But don't worry, you don't need to break the bank to get a practical and useful storage space. We're going to build a lean-to shed â€" a super simple, budget-friendly structure that’s perfect for beginners. Let's dive in!Planning Your Lean-To Shed
Before you even think about grabbing a hammer, we need a plan. This isn't rocket science, but a little forethought goes a long way.Choosing Your Location
Where will your lean-to live? Think about things like sunlight (you might want some for drying stuff), proximity to your house (for easy access), and the type of ground. A solid, level base is key. Avoid areas prone to flooding or where trees might pose a risk.
Determining Size and Materials
How big do you need your lean-to to be? Consider what you'll be storing. A small 4ft x 8ft lean-to might be perfect for tools, while a larger one might be needed for bikes and lawnmowers. As for materials, let's keep it simple and affordable:
- Pressure-treated lumber: This is essential for the frame, offering durability and resistance to rot.
- Plywood or OSB (Oriented Strand Board): For the walls and roof. OSB is generally cheaper.
- Roofing felt or inexpensive shingles: To protect your shed from the elements. Felt is budget-friendly but less durable than shingles.
- Concrete blocks or a level gravel base: For the foundation. This keeps the shed off the ground and prevents rot.
- Nails, screws, and a basic tool kit: Don't forget the essentials!
Sketching Your Design
Grab a pencil and paper (or use a digital drawing tool if you're tech-savvy). Draw a simple sketch of your lean-to, including dimensions. This doesn't have to be perfect; it just helps you visualize the project and figure out how much material you need.
Building Your Lean-To Shed: A Step-by-Step Guide
Okay, let's get our hands dirty!Preparing the Foundation
First, level the ground where your shed will sit. You can use a shovel and rake to clear any debris. Then, lay down your foundation. Concrete blocks are a good, stable option, but a level gravel base also works well. Remember to ensure your base is perfectly level for a structurally sound shed.
Constructing the Frame
This is where the pressure-treated lumber comes into play. Start by building the back wall of your lean-to. This will be your main support structure. Then, build the side walls, attaching them securely to the back wall. For the roof, use sturdy beams and ensure they're well-supported and have sufficient overhang to protect the walls from rain.
Adding the Walls and Roof
Now, it's time to cover your frame. Cut and attach your plywood or OSB sheets to the walls and the roof. Use nails or screws to secure the sheeting firmly. Make sure everything is square and aligned before moving on to the next step.
Applying Roofing Material
This is crucial for protecting your shed from the elements. Start by applying roofing felt (if you chose that option) or laying your inexpensive shingles. Overlap the sheets to prevent leaks. For shingles, follow the manufacturer's instructions for proper installation.
Finishing Touches
Once your roof is on, you can add some finishing touches. Consider adding a simple door if desired (this adds a bit more complexity but enhances security and convenience). You might also want to paint your shed to protect the wood and give it a nice look. A coat of exterior-grade paint will extend its lifespan and make it look great.
Tips for Keeping Costs Low
Building on a budget doesn't mean sacrificing quality. Here are a few tips to keep your costs down:
- Source materials wisely: Check your local hardware stores, lumber yards, and even recycling centers for discounted materials.
- Reuse and repurpose: Can you use old pallets for parts of the structure? Getting creative can save you a lot of money.
- Do it yourself: While you might be tempted to hire help, doing the work yourself is the most significant cost saver.
- Keep it simple: The more complex your design, the more expensive it becomes. A basic lean-to is the most cost-effective option.
Commonly Asked Questions
Here are some common questions people have about building lean-to sheds:
- Q: How long does it take to build a lean-to shed? A: Depending on your experience and the size of your shed, it could take anywhere from a weekend to a few weeks. This is a project that is best spread out over several days.
- Q: Do I need a permit to build a lean-to shed? A: This depends on your local building codes and the size of your shed. It's always best to check with your local authorities before starting your project.
- Q: Can I build this shed on uneven ground? A: No. You need a level base for stability. Invest some time in leveling the ground before you start building.
- Q: What kind of tools do I need? A: You'll need a basic toolkit including a hammer, saw, drill, level, measuring tape, and safety glasses.
- Q: Can I use regular lumber instead of pressure-treated lumber? A: It's strongly recommended to use pressure-treated lumber for the frame to prevent rot and extend the life of your shed.
- Q: How do I make it more secure? A: Adding a sturdy door and potentially a simple lock will increase security. Consider using stronger materials for the door frame and use longer screws to make it more difficult to pry open.
Remember, building a shed is a rewarding experience. Don't be afraid to get started! If you have any other questions, feel free to ask. Happy building!